Flush and change your own Automatic Transmission Fluid like a Pro
OBJECTIVE:
Provide AMSOIL Dealers with proper automatic transmission fluid and filter change procedures.
ISSUES Regarding Fast Lube Centers:
The use of automatic transmission flushing machines alone does not address the important tasks of changing the filter and cleaning the bottom of the transmission pan and magnet.
TECHNICAL DISCUSSION:
Flushing machines provide quick and convenient trans- mission fluid changes, but do not address transmission pan cleanliness or dirty filters. Removing the transmission pan allows the pan and magnet to be cleaned and the filter to be changed. AMSOIL recommends the filter always be changed with the fluid change to ensure the proper removal of contaminates.
RECOMMENDATION:
AMSOIL recommends one of these options when servicing an automatic transmission:
A. Replace the filter and the fluid in the transmission pan (Steps 1-11 and 13).
B. Replace the filter and completely exchange the old fluid with new fluid (Steps 1-13).
C. Use AMSOIL Engine and Transmission Flush (FLSH), followed by a filter change and complete fluid exchange (Steps 1-13 and additional Engine and Transmission Flush option).
Note: AMSOIL does not recommend using AMSOIL Engine and Transmission Flush if the transmission pan is not removable and the filter cannot be changed.
Getting Started:
Access the AMSOIL Online Product Application Guide for the correct transmission fluid, fluid quantity and transmission filter before starting the transmission and filter change procedure. Have these on hand when starting the fluid and filter change.
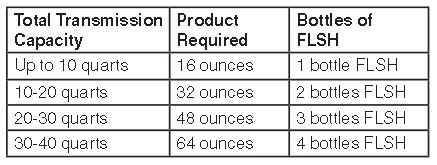
If the Online Product Application Guide does not list the vehicle’s information, contact the AMSOIL Technical Department at 605-274-2580 or tech@amsoil.com. If using AMSOIL Engine and Transmission Flush, follow the next three steps prior to draining the old transmission fluid, then proceed to steps 1-13. A. Engage the emergency brake. B. Determine the quantity of AMSOIL Engine and Trans- mission Flush required based on the following table, and add it to the transmission through the dipstick tube.
C. Idle the vehicle 10-15 minutes and move the shifter through the gear positions several times to allow FLSH (AMSOIL Transmission Flush) to reach all parts of the transmission (Begin Steps 1-13). Do NOT place the vehicle under heavy load or drive while FLSH is installed.
Automatic Transmission Fluid and Filter Change Procedure
1. For best results, transmission fluid should be at normal operating temperature before draining (Caution: the fluid will be hot).
2. With the engine off, disconnect the negative battery cable and support the vehicle securely to safely gain access to the transmission pan (be careful of hot exhaust and wear safety glasses). Position a drain pan under the transmission pan and begin the draining process by loosening the pan bolts. Do not remove them; just loosen them enough to break the transmission gasket seal and allow the full pan to hang away from the transmission supported by the loosened bolts. Loosen the bolts on one corner of the pan more than the rest, allowing the pan to be tilted while suspended from the bolts to allow additional fl uid to drain. (If the automatic transmission is equipped with a factory drain plug, simply remove it and allow the pan to drain. The bolts can then be fully removed and the pan taken off.)
3. Support the center of the transmission pan and finish removing the transmission pan bolts. Many people sup- port the center of the transmission pan with their hand while removing the bolts, but it’s important to ensure the fluid has cooled sufficiently enough to not cause burns. Keep the transmission pan level while lowering it from the transmission to prevent spills. Empty the remaining fluid into the drain pan. (To make this job easier next time, aftermarket transmission pan drain plug kits are available for some automatic transmissions. Follow the drain plug manufacturer’s instructions when installing.)
4. Most transmission filters are held in place with a bolt or two, but some are held by a clip. Consult the vehicle’s maintenance manual if unsure. Remove the old filter, O- rings and/or seals and properly discard them. If unsure of what O-rings and seals should come out with the filter, compare with the new filter kit since it should include re- placements for these items.
5. Install the new filter by using the same bolts or clips, and use the new O-rings or seals supplied with the new filter. Torque the bolts to factory specifications.
6. Inspect the pan before cleaning. A small amount of fine gray clutch dust is normal. However, metal shavings could be a sign of a mechanical malfunction or transmission damage, and a transmission shop should be consulted. If this is the transmission’s first filter change, an item that looks like a plastic plug the diameter of the dipstick opening may be found in the drain pan. Do not be alarmed. Some auto manufacturers plug the dipstick opening during the manufacturing process to prevent contamination on the assembly line. When the transmission is initially filled, the plug is knocked into the pan and remains there. It causes no harm and may be discarded
7. Clean the transmission pan thoroughly and wipe dry so there are no harmful residues or rag fibers remaining in the pan. Some transmission pans contain a magnet that should be cleaned and reinstalled in the same position in the transmission pan. Carefully clean the transmission and transmission pan mating surfaces of all gasket material. Do not gouge, scratch or damage these surfaces or a leak could result.
8. Position the transmission pan gasket on the pan (do not use gasket sealant unless otherwise specified by the auto manufacturer). Some gaskets have four or more holes slightly smaller than the bolt diameter. Lay the gasket on the pan and locate these holes. Thread the pan bolts through the pan and small holes in gasket to hold the gasket in place for installation. Carefully raise the pan to the transmission and start the bolts that are held to the pan by the small holes in the gasket. Carefully line up the remainder of the pan, gasket and transmission bolt holes and start the rest of the bolts.
9. Hand-tighten the transmission bolts in a crisscross pat- tern until snug. The pan should be able to be raised to its installed position against the transmission mating surface very easily. If there is any resistance, do not force it. Stop and investigate why. Use a torque wrench to tighten the bolts to the proper manufacturer-recommended torque specifications. Over-tightening the bolts could result in dimpled metal around the transmission pan bolt holes and subsequent leaks.
10. Refill the transmission through the dipstick fill tube using the amount shown as “refill capacity” in the owner’s manual or AMSOIL Product Selection Guide (G50).
11. If only performing a transmission pan fluid and filter change without use of AMSOIL Engine and Transmission Flush, skip to Step 13.
12. Follow these additional five steps if AMSOIL Engine and Transmission Flush was used and/or a transmission pan and torque converter fluid replacement is being performed.
1) Obtain the total transmission fluid capacity from the manufacturer or AMSOIL and have that amount of transmission fluid available, along with an extra quart or two for this procedure. (This is not the refill capacity; it is all of the fluid the transmission holds, including the torque converter.)
2) Place a drain pan large enough to hold the total transmission fluid capacity under the oil cooler. Disconnect the oil cooler lines from the oil cooler and direct the lines to- ward the drain pan.
3) Have an assistant be prepared to add transmission fluid to the transmission dipstick tube as fast as the old fluid is pumped out of the transmission line into the drain pan.
4) Securely insert a correct sized funnel into the transmission dipstick tube and have open bottles of new transmission fluid lined up and ready to use one after the other. Have the assistant start the engine and proceed to the drain pan to observe the fluid. Keep the funnel full as the transmission pumps the old fluid into the drain pan. Do not let the transmission run dry.
5) When the assistant sees the fluid color brighten or the total fluid capacity of the transmission has been replaced, shut the engine off and re-attach the oil cooler lines. \
13. With the vehicle on level ground, recheck the fluid level using the manufacturer’s procedures outlined in the owner’s manual. Check the transmission and lines for leaks.
DISCLAIMER:
The automatic transmission fluid and filter change procedures are meant to serve as guidelines only. These guidelines do not take into consideration variations between vehicles. Transmission fluid changes should only be conducted by individuals with the proper mechanical knowledge and training. Personal injury and/or transmission problems can occur when the proper precautions are not followed. If in doubt, have transmission serviced by individuals capable of performing this function.